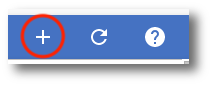
1. Navigate to Directory > Group Templates. Then, click Add in the top right corner.
2. Go through each section and configure the settings.
-
General Information
-
Group's Primary Language: This is the language emails from the Google groups service will be sent in.
-
Posting Options: Checking the box allows users to post to the group on the web.
-
-
Directory
-
Global Address List - Include this group in Global Address Lists: This option includes the group in your Google Workspace Global Address List. When included in the list, the group becomes available to Google Workspace Sync for Microsoft Outlook users.
-
-
Content Control
-
Archive Options - Archive messages to the group: When this option is unchecked, messages sent to the group will not be archived. Previously received messages will remain archived. Only archived messages are visible through the web interface.
-
-
Settings
-
Can Post as Group: Check this box to allow members to post as the group
-
Moderate Messages: Select whether or not to moderate group messages by members or non-members
-
Rejected Author Notification: Check this box to notify authors when moderators reject their posts.
-
Spam Messages: Select how spam messages should be handled
-
Post Replies: Select how replies to posts can be sent
-
-
Permissions
-
View Topics: Select which users can view topics in this group
-
-
Post: Select which users can post messages to the forum
-
View Members: Select which users can view the forum membership list
-
Invite Members: Select which users can invite other users to become a member
-
Anyone in the organization - Anyone in the organization can add themselves to the group directly
-
Anyone in the organization can ask - Anyone in the organization must ask and then be approved before they can join the group
-
Only invited users - People can join the group only if they're invited
-
-
Join the Group: Check this box to allow users not in the organization to join
-
Who Can Moderate Members: Select which users can add and remove group members
-
Who Can Moderate Content: Select which users can approve, delete, and lock messages and/or conversations
-
Who Can Assist Content
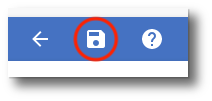
2. Once you have completed configuring the settings of your group template, click Save in the top right corner.
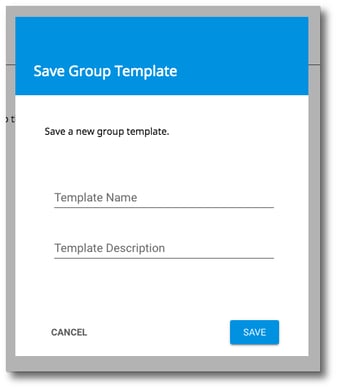
3. In the popup, enter the template name and description. Then click Save.
Now the template is created and you can use it when creating a new group.