Contents
- The device didn’t start correctly
- You need to re-enroll a device with a different domain
Streamline every step of your Google life with Promevo
Before you begin
- You need Chrome management licenses for all of the devices that you're going to re-enroll. If you do not have Chrome management licenses, purchase them from our online store here or speak to one of our Chrome experts for more information.
- You also need to wipe your device before you can re-enroll it. This guarantees that the device no longer has any local user data. Click here to learn how to factory reset a Chromebox. For those with Chromebooks, keep reading to learn how to wipe the device.
Step 1: Wipe the deprovisioned Chromebook
- Turn off your Chromebook.
- Press the Esc+ and +Power keys.
- This will display a yellow exclamation point or “Please insert a recovery USB stick.”
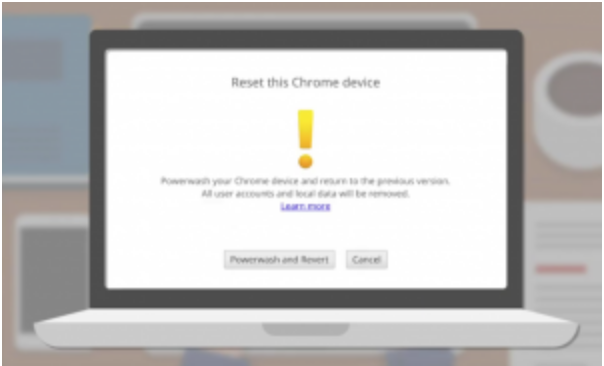
- Press Ctrl+D to begin Developer mode, then press “Enter.”
- Press Space, then press “Enter.” The Chromebook will delete local data and return to its initial state. Note that this can take about 40 minutes. If forced re-enrollment is enabled for the device, you’ll see that Developer mode is blocked. This shortens the wipe process and allows for re-enrollment when the device automatically restarts in Verified mode.
- When the transition is over, press the spacebar, then press “Enter” to return to Verified mode.
Step 2: Re-enroll the deprovisioned Chromebook to your domain
- Turn on the Chrome device and follow the onscreen instructions until you see the sign-in screen. Don't sign in yet.
- Before signing in to the Chrome device, press Ctrl + Alt + E to go to the enrollment screen.
- Enter the username and password from your Google admin welcome letter or the username and password for an existing Google Workspace user on your account that is eligible to enroll. If prompted, enter the asset ID and location.
- For devices with ChromeOS version 103 or earlier, click “Next.”
- For devices with ChromeOS version 104 or later:
- Chrome Enterprise Upgrade or Chrome Education Upgrade: Click “Enroll enterprise device.”
- Kioski and Signage Upgrade: Click “Enroll kiosk or signage device.” Click “Confirm.”
Note: You can control which users can enroll in your domain with the Enrollment Permissions user policy
- Click “Enroll device.” You'll receive a confirmation message when you have successfully enrolled the device.
Why Promevo?
As a Google partner, Promevo takes a holistic approach to your Google life. From Chrome device solutions to Google Workspace management — Promevo partners with you to ensure your success in your Google journey.
You can shop Chrome devices on our online store or get in contact with one of our sales advisors if you have more questions. If you need additional support or training, we are here for you. All Promevo customers get free support from our Google-certified specialists. You can search our Knowledge Base, talk to our support team, or even schedule free training.
Frequently Asked Questions
How do I reset the enrollment on my Chromebook?
To reset enrollment on your Chromebook, you first need to wipe the device by following the directions listed above. Then, you can re-enroll your device. Follow our instructions in this blog and visit this page for more information.
What happens if I deprovision a Chromebook?
Deprovisioning a Chromebook removes all the policies on the device and removes device-level printers and the ability to use the device as a kiosk. Organizations often deprovision Chromebooks if they are lost or stolen.
How do I enable a disabled Chromebook?
Re-enabling a disabled device will consume a license, so ensure you have an available upgrade before performing this function. To re-enable a device, follow these steps:
- From the Admin console home page, go to “Devices,” then “Chrome devices.”
- At the top, use the filter to list the disabled devices.
- To apply settings to everyone, leave the top organizational unit selected. Otherwise, select a child organizational unit.
- Check the box next to the device you want to re-enable.
- At the top, click “Re-enable selected devices.”
- Click “Enable” to confirm.
What happens if a Chrome device is not enrolled?
If a Chrome device is not enrolled with your organization, it won’t have any of the policies you’ve set in place or any permissions, like using printers, available.
Shop Chrome Devices